Maxime Rastello

Use Azure AD Cloud Kerberos ticket for on-premises resources

Microsoft has released for a long time now the ability for Azure Active Directory (now Microsoft Entra ID) to deliver a cloud Kerberos ticket when a user opens its Windows session.

Cloud Kerberos trust has been used by several Microsoft products in the past few years:

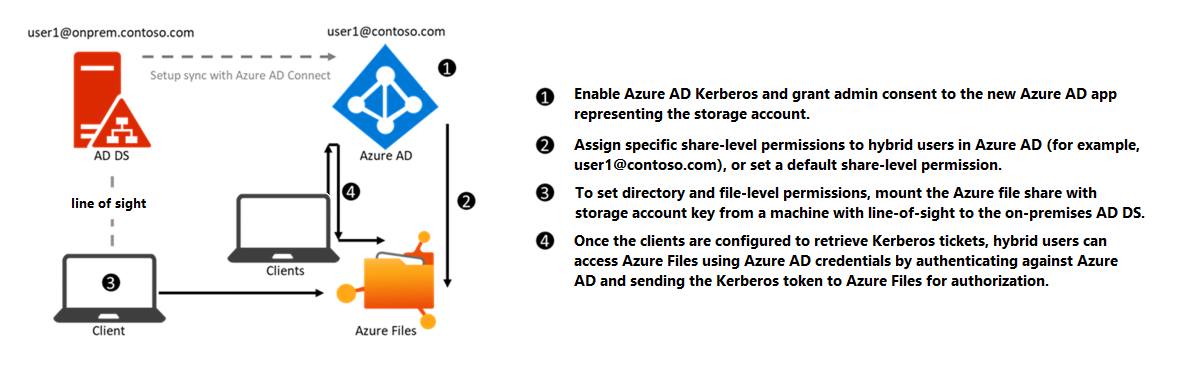
This diagram shows how a device authenticates to a cloud storage account using Azure AD Kerberos authentication:

Scenarios

I’ve been able to test the following scenarios:

  • Authenticate to a Kerberos-based web application hosted on a domain-joined IIS server (doc here)
  • Authenticate to Exchange Server web services (OWA, ECP, Autodiscover, EWS…) when Kerberos authentication is enabled with ASA Credential (doc here)

Using an Azure AD Kerberos ticket instead of an Active Directory Kerberos ticket could be useful in the following situations:

  • You have access to a Kerberos-based web application but your device is not in a light of sight of a domain controller
  • You published a Kerberos-based web application using Microsoft Entra Global Secure Access but the client cannot connect to a domain controller through the tunnel

Note: only TCP is currently supported by the Microsoft Entra Global Secure Access client at the moment.

Prerequisites

To be able to leverage Azure AD Kerberos authentication, the following prerequisites must be met:

  • Your web application is configured to use Active Directory Kerberos Authentication
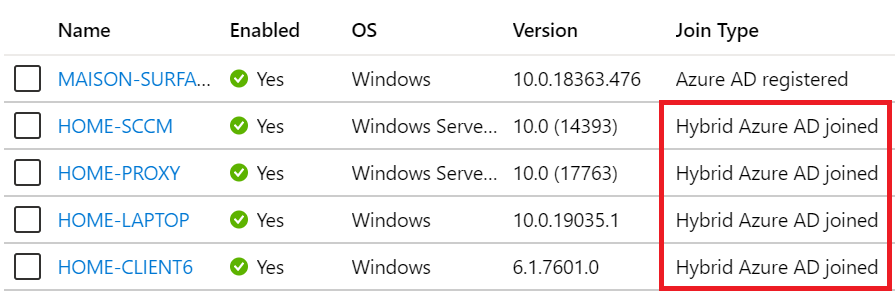
  • The device used for app access must be Hybrid Azure AD Joined or Azure AD Joined
  • Users must be synced from AD to Azure AD
  • Azure AD Kerberos Trust must be configured using the Azure AD Hybrid Authentication Management PowerShell module (doc here)
  • Cloud Kerberos retrieval must be activated at user logon on the device by one of the following methods:

    CSP : Kerberos/CloudKerberosTicketRetrievalEnabled set to 1

    GPO
     : Administrative Templates\System\Kerberos\Allow retrieving the Azure AD Kerberos Ticket Granting Ticket during logon

    Registry : reg add HKLM\SYSTEM\CurrentControlSet\Control\Lsa\Kerberos\Parameters /v CloudKerberosTicketRetrievalEnabled /t REG_DWORD /d 1

How it works

When Azure AD Kerberos Trust is properly configured, a Cloud Kerberos ticket is generated for the user when you first log on to a Windows or Windows Server machine.

You can see the Kerberos tickets currently available by using the klist command:

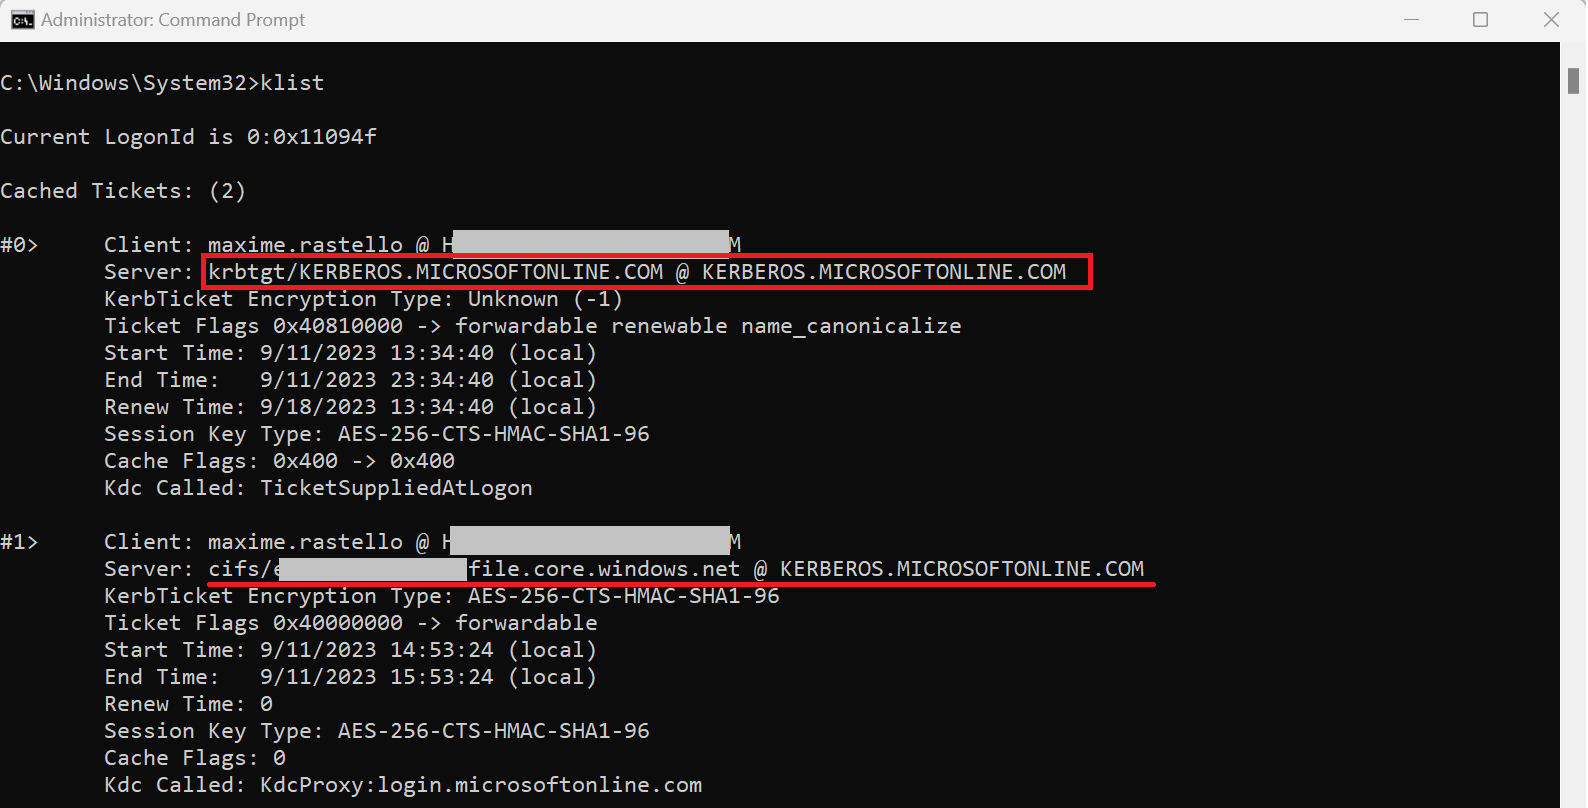
The principle is simple: we will configure your Windows workstation to map a Kerberos web app authentication with this Cloud Kerberos ticket using the cloud realm KERBEROS.MICROSOFTONLINE.COM

Kerberos realm configuration

To map the Cloud Kerberos ticket with your on-premises web apps, we will use the setting Hostname to Kerberos realm mappings. You can configure this setting using:

  • A Microsoft Intune Settings catalog profile
  • A Group Policy Object (GPO)
  • A command line

Using GPO

  1. Create a new GPO and link it to your workstations
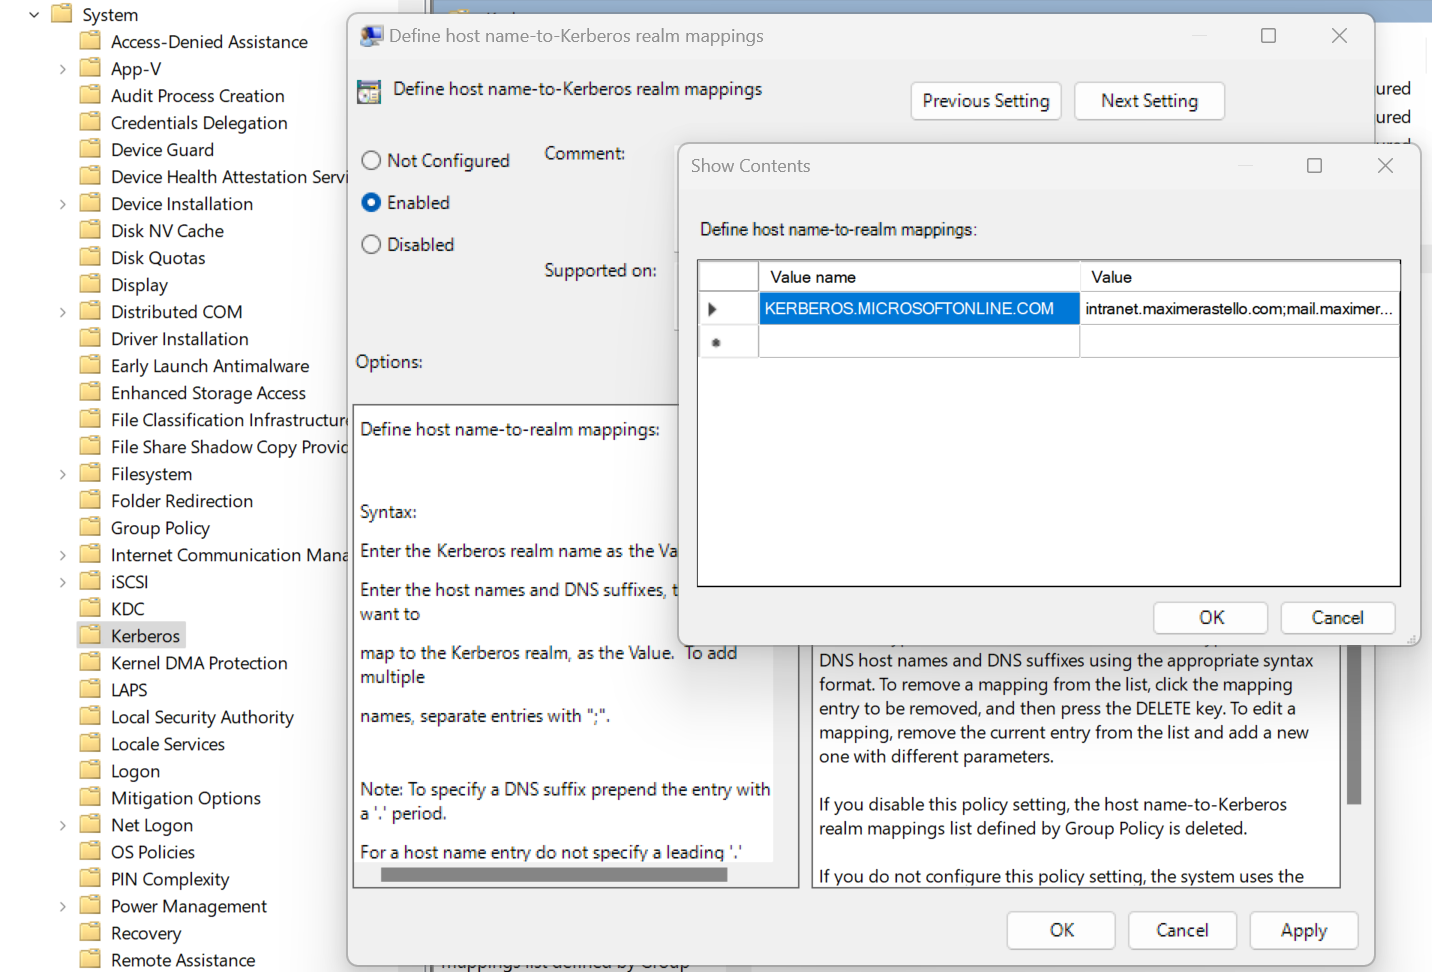
  2. Go to Computer Configuration > Administrative Templates > System Kerberos and configure the parameter Define host name-to-Kerberos realm mapping
  3. Create a new entry with the following values:
    • Value name: KERBEROS.MICROSOFTONLINE.COM
    • Value: <AppFQDN1>;<AppFQDN2>
      (ex: intranet.maximerastello.com;mail.maximerastello.online)

Using Microsoft Intune

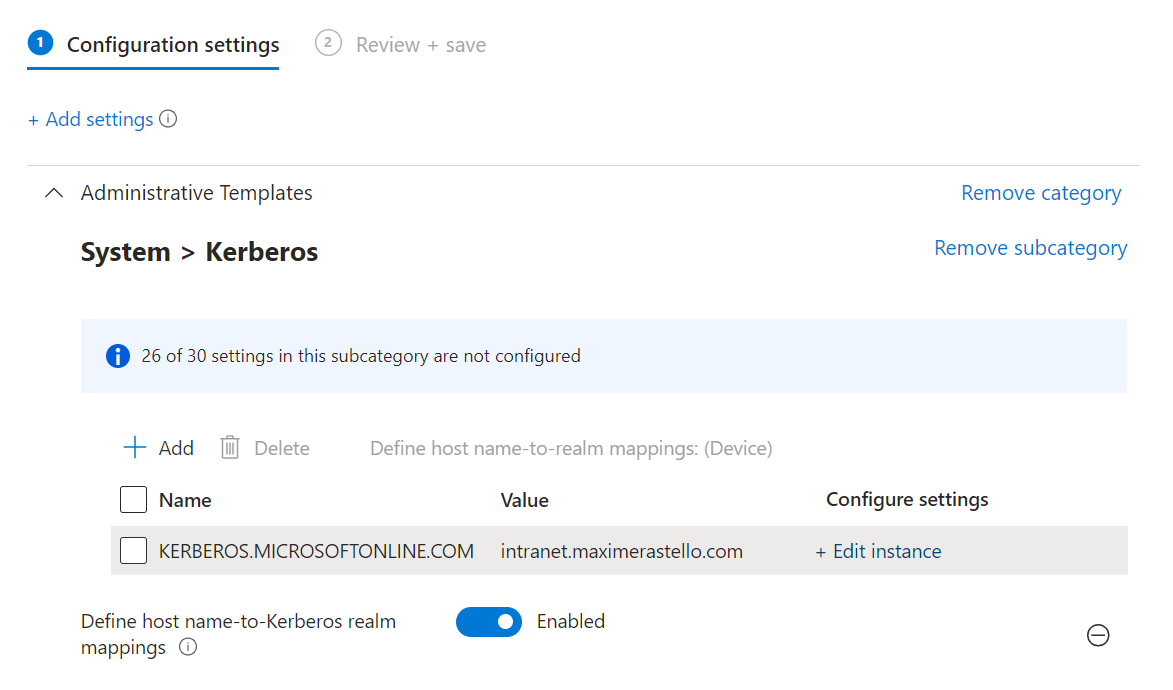
  1.  Create a new Windows configuration profile using Settings Catalog
  2. Go to Administrative Templates > System Kerberos and add the setting Define host name-to-Kerberos realm mapping
  3. Set the following parameters:
    • Name: KERBEROS.MICROSOFTONLINE.COM
    • Value: <AppFQDN1>;<AppFQDN2>
      (ex: intranet.maximerastello.com;mail.maximerastello.online)


Using Command Line

  1. Open a Command Prompt or a PowerShell console as an administrator
  2. Enter the following command:ksetup /addhosttorealmmap <AppFQDN> KERBEROS.MICROSOFTONLINE.COM

This will create a new registry key in HKLM\SYSTEM\CurrentControlSet\Control\Lsa\Kerberos\HostToRealm

Cannot access to Teams Admin Center because of Administrative Unit Role Assignment

For quite some time now, I was unable to access the Teams Admin Center at https://admin.teams.microsoft.com. My account was the only one impacted as other admins could connect just fine.


There are issues loading the site.
We can’t get to the Teams Admin Center right now. Something went wrong.

https://admin.teams.microsoft.com/service-unavailable


After reviewing the role assignments on my account using the AzureAD PowerShell module, I’ve detected that a stale role assignment linked to a deleted administrative unit :


Get-AzureADMSRoleAssignment | ft -Autosize


However, all the administrative units in the directory have been deleted one day ago :

Get-AzureADMSAdministrativeUnit


After deleting the stale role assignment using PowerShell, I can now access the Teams Admin Center.


Remove-AzureADMSRoleAssignment -Id <AssignmentId>

This cmdlet did not work at first with “Access Denied”, as I think 24h was needed to propagate the deletion of the administrative units.

Avoid certificate prompt for Azure Active Directory Certificate-Based Authentication (CBA)

Azure Active Directory Certificate-Based Authentication (Azure AD CBA) allows you to authenticate to Azure Active Directory using a certificate from your internal Public Key Infrastructure (PKI). To know how to implement Azure Active Directory CBA, please refer to the Microsoft doc.


Certificate authentication will happen on the URL https://certauth.login.microsoftonline.com. By default, your web browser will prompt you to select a certificate installed on your Personal User Certificate store.


To avoid the user to manually select a user certificate for authentication, you can use the following parameters with Microsoft Edge :


Configuration

Registry

Create the following registry key either in CURRENT_USER or LOCAL_MACHINE :

  • Type : REG_SZ
  • Name : 1 (or any following number if you already have parameters configured here)
  • Location :
    • User setting: HKEY_CURRENT_USER\SOFTWARE\Policies\Microsoft\Edge\AutoSelectCertificateForUrls
      OR
    • Device setting: HKEY_LOCAL_MACHINE\SOFTWARE\Policies\Microsoft\Edge\AutoSelectCertificateForUrls
  • Value : check below

Documentation


GPO or MDM

Create a GPO in Active Directory or a Settings Catalog profile in Microsoft Endpoint Manager and set the following parameter :

  • Parameter : Automatically select client certificates for these sites
  • Location : Administrative Templates / Microsoft Edge / Content settings
  • Value : check below


Parameter value

Here is a generic sample of the possible values for the parameter:

{"pattern":"https://www.contoso.com","filter":{"ISSUER":{"CN":"certificate issuer name", "L": "certificate issuer location", "O": "certificate issuer org", "OU": "certificate issuer org unit"}, "SUBJECT":{"CN":"certificate subject name", "L": "certificate subject location", "O": "certificate subject org", "OU": "certificate subject org unit"}}}

Make sure you customize the JSON parameters based on your needs and apply it to the pattern https://certauth.login.microsoftonline.com.

Here is my example:

{"pattern":"https://certauth.login.microsoftonline.com","filter":{"ISSUER":{"CN":"AZURE-CA"}}}

Replace AZURE-CA by the CN of your issuing CA


Validation

You can check that the setting is properly applied in Microsoft Edge using the tag edge://policy


To validate the automatication certificate selection:

  1. Restart Microsoft Edge
  2. Go to https://certauth.login.microsoftonline.com.
  3. You should be automatically authenticated and redirected to https://www.office.com.

Manually re-enroll a Hybrid Azure AD Join Windows 10 / Windows 11 device to Microsoft Intune without loosing the current configuration

Edit 01/06/2022 : updating this article to include Azure Virtual Desktop Windows 10 / Windows 11 multi-session enrollment command using Device Credential

——–

There are several ways to enroll a Windows 10 PC to Microsoft Intune:

Manually

  • During the Out-of-the-box Experience (OOBE), when starting a Windows 10 PC for the first time
  • In the Windows Settings, after the PC configuration

Manual enrollment will require that the user enters his Azure AD credentials.


Automatically

  • Using Azure AD Join + automatic Intune enrollment
  • Using Hybrid Azure AD Join + automatic Intune enrollment

Automatic enrollment can be triggered using a Group Policy, SCCM Co-Management or Windows AutoPilot.

Windows 10 automatic enrollment requires the creation of public DNS records enterpriseregistration and enterpriseenrollment. More info here.


However, sometimes it is possible that a Windows 10 PC is in an inconsistent enrollment state, with error “The sync could not be initiated“.


This can happen because:

  • The PC was shut down during a long time, and the Microsoft Intune certificate is expired (located in Local Machine / Certificates / Personal)
  • Someone manually deleted the Microsoft Intune certificate
  • The PC is enrolled in another Intune tenant

Prerequisites: check Hybrid Azure AD Join status

Before re-enrolling your device to Microsoft Intune, you need to make sure that the certificates for Hybrid Azure AD Join are not expired as well.

Follow this procedure to Manually re-register a Windows 10 / Windows 11 or Windows Server machine in Hybrid Azure AD Join.


Method 1: With data and configuration loss


The easiest way to unenroll a Windows 10 PC from Microsoft Intune is to disconnect the work or school account.


Just go to All settings > Accounts > Access work or school, select your corporate account and click Disconnect.

Important: this menu is not available on Windows 10 / Windows 11 multi-session edition for Azure Virtual Desktop.


However, the problem with this is that all data and configuration pushed by Microsoft Intune will be deleted from the PC.


Method 2: Without data or configuration loss


There is a way to manually re-enroll your Windows 10 PC without loosing all the current configuration and apps deployed by Microsoft Intune.

This method is not officially supported by Microsoft


As you may know, automatic enrollment can be triggered either by a Group Policy Object or by the SCCM client on a co-managed device.

In both cases, the feature will basically create a scheduled task to enroll the PC at next logon. The command is different if you are trying to enroll Windows 10 / Windows 11 Enterprise multi-session devices from Azure Virtual Desktop (using Device Credential) or a regular Windows 10 / Windows 11 device using User Credential:


Windows 10 / Windows 11 Enterprise (with User Credential)


Task launched in the SYSTEM context:

%windir%\system32\deviceenroller.exe /c /AutoEnrollMDM


Windows 10 / Windows 11 Enterprise Multi-session for Azure Virtual Desktop (with Device Credential)


Task launched in the SYSTEM context:

%windir%\system32\deviceenroller.exe /c /AutoEnrollMDMUsingAADDeviceCredential


To manually re-enroll the PC, we will need to clean up the environment and relaunch this command in the SYSTEM context to re-enroll the PC.

Here are the steps that you need to follow to make it work:

  1. Delete stale scheduled tasks
  2. Delete stale registry keys
  3. Delete the Intune enrollment certificate
  4. Restart the enrollment process

Step 1: Delete stale scheduled tasks

Follow this procedure:

  • Run the Task Scheduler as an administrator.

  • Go to Task Scheduler Library > Microsoft > Windows > EnterpriseMgmt. Write down the enrollment ID somewhere, you will need it for the cleanup.

  • Delete all the existing tasks the enrollment folder.

  • Delete the enrollment ID folder.

Step 2: delete stale registry keys

Use the previous enrollment ID to search the regitry:

  • Open the Registry Editor as an administrator.

  • Search for the enrollment ID you wrote in the following locations and if found, delete the key that is containing the ID:
    • HKEY_LOCAL_MACHINE\SOFTWARE\Microsoft\Enrollments\xxxxxxxxxxxxx
    • HKEY_LOCAL_MACHINE\SOFTWARE\Microsoft\Enrollments\Status\xxxxxxxxxxxxx
    • HKEY_LOCAL_MACHINE\SOFTWARE\Microsoft\EnterpriseResourceManager\Tracked\xxxxxxxxxxxxx
    • HKEY_LOCAL_MACHINE\SOFTWARE\Microsoft\PolicyManager\AdmxInstalled\xxxxxxxxxxxxx
    • HKEY_LOCAL_MACHINE\SOFTWARE\Microsoft\PolicyManager\Providers\xxxxxxxxxxxxx
    • HKEY_LOCAL_MACHINE\SOFTWARE\Microsoft\Provisioning\OMADM\Accounts\xxxxxxxxxxxxx
    • HKEY_LOCAL_MACHINE\SOFTWARE\Microsoft\Provisioning\OMADM\Logger\xxxxxxxxxxxxx
    • HKEY_LOCAL_MACHINE\SOFTWARE\Microsoft\Provisioning\OMADM\Sessions\xxxxxxxxxxxxx

DO NOT delete registry keys that are not in the list above. They will be overwritten after the new enrollment.


Step 3: delete the Intune enrollment certificate

Follow the procedure:

  • Search for the option “Manage computer certificates” or use the command certlm.msc as an administrator.

  • Go to Personal > Certificates and delete the certificate issued by either “Microsoft Intune MDM Device CA” or “SC_Online_Issuing” (depending on the date of the enrollment).

Step 4: Restart the enrollment process

To be properly executed, the enrollment command must be entered in a SYSTEM context. We will use the PSExec tool for that purpose.


  • Use PSExec to launch a Command Prompt as SYSTEM:
psexec /i /s cmd

  • In the Command Prompt, enter one of the following command depending on your enrollment type:

Windows 10 / Windows 11 Enterprise (using User Credential)

%windir%\system32\deviceenroller.exe /c /AutoEnrollMDM

Windows 10 / Windows 11 Enterprise Multisession for Azure Virtual Desktop (using User Credential)

%windir%\system32\deviceenroller.exe /c /AutoEnrollMDMUsingAADDeviceCredential

  • In the computer certificate store, check that a new Intune certificate has been enrolled for the device:

  • You are now ready to start a policy sync from the Windows Settings, and check that the connection with the Intune service is now OK:

Manually re-register a Windows 10 / Windows 11 or Windows Server machine in Hybrid Azure AD Join

Hybrid Azure AD Join devices are machines under Windows 10+ or Windows Server 2016+ that are:

  • Joined to an on-premises Active Directory domain
  • Registered in Azure AD as a hybrid device

Having a Hybrid Azure AD Joined device enables the following features:

  • Automatic device enrollment in Microsoft Intune
  • Device-based conditional access for corporate devices
  • Backup of the BitLocker recovery key in Azure AD
  • Sync of some Windows settings by the Enterprise State Roaming


Sometimes, a machine can be in an inconsistent registration state in Azure Active Directory. This can happen because:

  • The machine was shut down during a long time, and the Azure AD device registration certificate is expired (located in Local Machine / Certificates / Personal)
  • Someone manually deleted the device registration certificate
  • Someone manually deleted the device object in the Azure AD portal
  • The machine is registered in another Azure AD tenant

Please note that this method will only succeed if your organization meets all the prerequisites for Hybrid Azure AD Join. For more information, please refer to this documentation.


Step 1: Unregister the device from Azure AD

Follow this procedure:

  • On the machine to unregister, launch a Command Prompt as an administrator and type the following command:
dsregcmd /leave

  • Make sure the certificates issued by “MS-Organization-Access” and “MS-Organization-P2P-Access [xxxx]” have been deleted from the local machine Personal certificate store:

  • Type the command dsregcmd /status in a Command Prompt, and make sure the following parameters have the appropriate values:
dsregcmd /status

+----------------------------------------------------------------------+
| Device State                                                         |
+----------------------------------------------------------------------+
AzureAdJoined : NO  <-----
EnterpriseJoined : NO
DomainJoined : YES  <-----

Step 2: Re-register the device as a Hybrid Azure AD Join

Follow this procedure:

  • On the machine to re-register, run the Task Scheduler as an administrator.

  • Go to Task Scheduler Library > Microsoft > Windows > Workplace Join and manually start the task “Automatic-Device-Join“.

  • Make sure the certificates issued by “MS-Organization-Access” and “MS-Organization-P2P-Access [xxxx]” have been created in the local machine Personal certificate store:

  • Type the command dsregcmd /status in a Command Prompt, and make sure the following parameters have the appropriate values:
dsregcmd /status

+----------------------------------------------------------------------+
| Device State                                                         |
+----------------------------------------------------------------------+
AzureAdJoined : YES  <-----
EnterpriseJoined : NO
DomainJoined : YES

  • Reboot the PC.

  • Start an Azure AD Connect delta synchronization.

aOS Monaco – 26/09/2019 – Sécurisez vos services Office 365 avec la suite Microsoft 365

La communauté aOS (Azure Office 365 SharePoint) et le Monaco Microsoft User Group (MMUG) vous invitent à la 1ère édition de la journée aOS Monaco le 26 Septembre 2019.

Pendant une journée entière, vous pouvez rencontrer et échanger avec des experts des technologies Office 365 et Azure. Différentes sessions vous seront proposées où nous vous apporteront des retours terrain. Il vous sera ainsi possible de découvrir ou approfondir vos connaissances sur :

  • Azure
  • Office 365
  • Microsoft Teams, SharePoint
  • Power Platform : Power BI, PowerApps, Microsoft Flow

Ce sera aussi l’occasion de partager et échanger entre utilisateurs et professionnels, locaux, nationaux et internationaux, de l’offre Cloud Microsoft.

J’animerai un atelier deep-dive “Sécurisez votre SI et vos services Office 365“, alors n’hésitez pas à réserver vos agendas 🙂

agenda aos monaco 2019

Le Numérique Pour Tous – Conférences

L’association Le Numérique Pour Tous organise plusieurs conférences sur le digital, de Février à Mai 2019.

Ces conférences gratuites se dérouleront à la Bibliothèque municipale Kateb Yacine du centre commercial Grand’ Place, à Grenoble :

  • 7.02.2019 : S’équiper en appareils numériques
  • 7.03.2019 : Sécuriser et entretenir son environnement numérique
  • 4.04.2019 : Réseaux sociaux et communication
  • 2.05.2019 : Quels outils alternatifs libres ou gratuits ?

N’hésitez pas à y assister !

Mise à jour Mai 2018 Windows et erreur CredSSP Remote Desktop (Encryption Oracle Remediation)

Petite note car je vois pas mal de soucis chez nos clients.

Microsoft a changé le fonctionnement de l’authentification RDP entre clients / serveurs.


Le but de ce décalage de 2 mois était de patcher d’abord les serveurs (Mars), puis les clients (Mai) pour que ces derniers puissent s’y connecter 2 mois après.

Suite à ces modifications, la connexion RDP à des serveurs non-patchés depuis des clients patchés peut échouer (erreur CredSSP).


An authentication error has occured.
The function requested is not supported
This could be due to CredSSP encryption oracle remediation


Voici les scénarios possibles :

Ne fonctionne pas

  • Serveur non patché depuis Mars / client patché depuis Mai

Fonctionne

  • Serveur non patché depuis Mars / client non-patché
  • Serveur patché depuis Mars / client non-patché
  • Serveur patché depuis Mars / client patché depuis Mai


Workaround (fortement déconseillé)

Si un client a été patché alors que le serveur n’est pas à jour, il est possible de désactiver le Network Level Authentication côté serveur de manière temporaire pour s’y connecter.


Il est aussi possible de désactiver la fonctionnalité “Encryption Oracle Remediation” par GPO sur les serveurs non-patchés :

  1. Si pas encore fait, installez les ADMX pour Windows 10 build 1803 (ou supérieur)
  2. Allez dans Computer Configuration -> Administrative Templates -> System -> Credentials Delegation
  3. Modifiez le paramètre Encryption Oracle Remediation en Enabled / Vulnerable


Note : La recommandation officielle reste toutefois de patcher serveurs et clients.


Digital Experience – Bordeaux – Nouveau poste de travail à l’heure du cloud et de la mobilité

J’ai l’honneur de vous annoncer la création de l’évènement Digital Experience à Bordeaux, en collaboration avec AZEO et Microsoft. Cet évènement gratuit se déroulera à l’hôtel Mercure Bordeaux Château Chartrons.

J’aurais l’opportunité de présenter une conférence sur la gestion moderne du poste de travail Windows, à l’heure du cloud et de la mobilité. Nous discuterons des sujets comme le management via Intune, le provisioning via AutoPilot et bien d’autres.

N’hésitez pas à vous inscrire maintenant, les places étant limitées.

Tour de France Microsoft 365 – Paris – 11 Avril 2018

Microsoft organise un Tour de France afin de présenter plus en détails la suite Microsoft 365.

J’aurais l’opportunité de présenter la version parisienne en collaboration avec quelques collègues de Microsoft France, qui se déroulera le 11 Avril 2018 chez Microsoft France, à Issy-Les-Moulineaux.

Voici le plan de cette demi-journée :

  • 9:00-9:30 : Accueil & petit-déjeuner
  • 9:30-10:00 : Découverte de la solution Microsoft 365 pour les entreprises et les collectivités
  • 10:00-10:15 : Annonce de l’arrivée des Data Center Office 365 en France
  • 10:15-11:00 : Focus sur la sécurité et GDPR au sein de votre entreprise
  • 11:00-11:30 : Présentation des offres et de l’expertise AZEO

N’hésitez pas à vous inscrire ici.